Burr replacement is the most significant maintenance procedure on the Breville BES870XL grinder system. Burrs are consumable components; their hardened steel cutting edges gradually dull with use, and their ability to produce consistent grind particle sizes diminishes over time. Knowing when to replace the burrs, sourcing the correct replacement parts, and executing the installation correctly are all skills that extend the working life of the BES870XL significantly.
When Do BES870XL Grinder Burrs Need Replacing?
Burr wear on the BES870XL follows a predictable trajectory, but the rate of wear is heavily influenced by usage patterns and bean characteristics. There are four primary indicators that burr replacement is warranted.
- Grind consistency has degraded despite correct settings and a clean grinder. When burr edges dull, they produce a wider spread of particle sizes. The espresso shot will show signs of uneven extraction, sour and bitter notes in the same cup, channeling, and difficulty finding a stable extraction window. These symptoms persist regardless of grind setting adjustments.
- Significantly more grounds are required to achieve the same dose weight. Worn burrs are less efficient at cutting; they produce more “fines” (dust-like particles) per gram of whole bean, shifting the effective dose and requiring recalibration.
- The grinder is unusually loud during normal operation. Increased grinding noise, particularly a higher-pitched or more abrasive sound, indicates increased friction between the burr surfaces, often caused by uneven wear or micro-chipping.
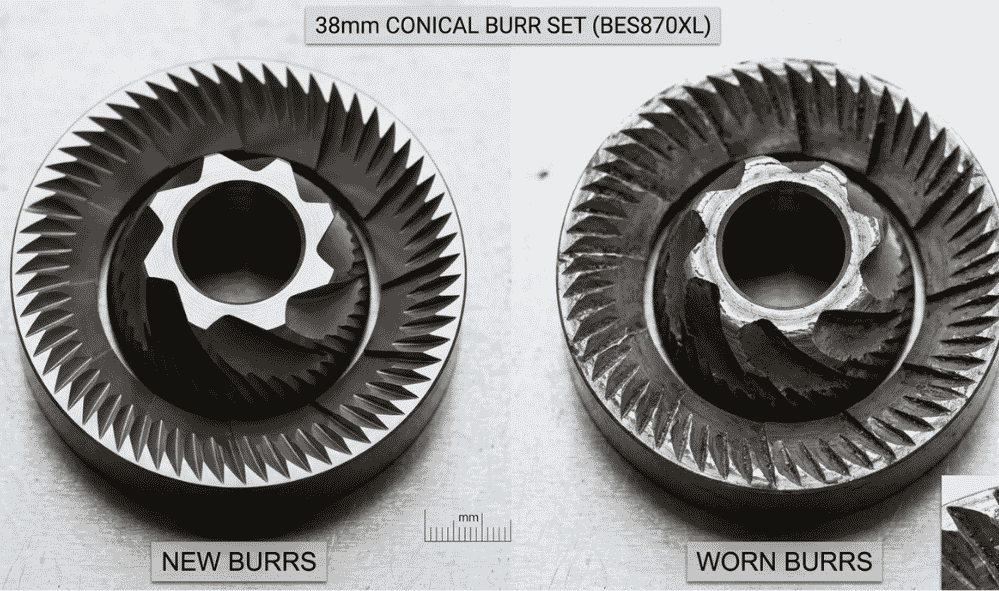
- The burrs show visible damage. After a foreign object jam, chipped or cracked burr teeth are cause for immediate replacement regardless of age.
Under normal home use (one to three shots daily), BES870XL burrs typically maintain acceptable performance for 18 to 24 months. Heavy users or those grinding 10+ shots daily should expect to replace burrs annually.
Sourcing the Correct Replacement Burrs
The BES870XL uses a 38mm conical burr set. Breville sells these as a service part under part numbers SP0001837 (upper burr) and SP0001836 (lower burr), though availability varies by region and supply chain conditions. Third-party compatible burrs are available from suppliers, including IMS and generic OEM manufacturers. Verify compatibility with the BES870XL/Barista Express platform before purchasing.
When ordering replacement burrs, purchase both the upper and lower burr simultaneously. The two burrs form a matched cutting pair; replacing only one creates a mismatch between a worn surface and a new one, which actually produces worse grind consistency than two worn burrs running together until both are replaced.
Tools Required
- Phillips-head screwdriver (PH2)
- Flat-head screwdriver (small)
- Hex key set (metric and imperial)
- Tweezers
- Cleaning brush and dry microfiber cloth
- Flashlight
Step 1: Prepare the Machine
Unplug the BES870XL and allow it to cool completely if it has been recently used. Remove the bean hopper, clear all remaining beans, and run the grinder briefly to expel any beans in the grinding chamber (do this before unplugging with an empty hopper so no beans remain in the chamber). Remove the drip tray and the portafilter from the group head. Having clear access to the machine from above and from the front makes the disassembly significantly easier.
Step 2: Remove the Bean Hopper and Upper Burr Carrier
Rotate the grind size adjustment collar counterclockwise (when viewed from above) to the coarsest setting. This moves the upper burr carrier to its highest position, giving maximum clearance for removal. Locate the release mechanism for the upper burr carrier on the BES870XL. The carrier is secured by a quarter-turn bayonet lock. Turn the carrier counterclockwise until it disengages from the bayonet slots and lift it straight out of the grinding chamber.
Step 3: Remove the Upper Burr from the Carrier
Depending on the production variant, the upper burr is attached to the carrier via a press-fit with a single retaining clip, a threaded retaining ring, or a plain press-fit without a clip. Inspect the attachment method carefully before attempting removal. Forcing a press-fit burr without the correct technique can crack the carrier housing. Clean the carrier thoroughly before installing the new upper burr. Remove all grounds residue from the carrier socket, the adjustment collar threads, and the bayonet lock surfaces.
Step 4: Access and Remove the Lower Burr
The lower burr is mounted on the drive spindle at the base of the grinding chamber. With the upper burr carrier removed, it is visible at the bottom of the chamber. The lower burr is typically held by a single Phillips-head machine screw at the center of the drive spindle. Insert the PH2 screwdriver, hold the burr surface with one hand to prevent rotation, and turn the screw counterclockwise to remove.
Critical:
Do not lose the small alignment pin that locates the lower burr on the drive spindle. This pin ensures the burr seats in the correct rotational position. If it falls into the grinding chamber during disassembly, recover it before proceeding.
Step 5: Install the New Lower Burr
Seat the new lower burr onto the drive spindle, aligning the alignment pin groove on the burr with the pin on the spindle. Thread the retaining screw by hand first to ensure it is not cross-threading, then tighten firmly but not with excessive torque. The screw is threading into a relatively soft material and can strip if over-tightened.
Step 6: Install the New Upper Burr
Install the new upper burr into the carrier using the reverse of the removal procedure. If using a press-fit design, apply even downward pressure to seat the burr fully into the carrier socket. It should be flush with the carrier face with no gap or rocking. Reinstall the upper burr carrier assembly into the grinding chamber. Align the bayonet tabs with the slots, lower the carrier into position, and rotate clockwise until the locking click is felt.
Step 7: Post-Installation Calibration
New burrs require calibration to establish the zero point, the position where the upper and lower burr surfaces just contact each other.
- With the bean hopper removed and the machine plugged in, slowly rotate the grind size collar clockwise (toward a finer setting) while the grinder is running.
- Continue turning slowly until the burrs begin to contact; you will hear a distinct metallic clicking or scraping sound.
- Note this position as the new zero point (burr contact).
- Rotate the collar back counterclockwise by one to two full numbers from this contact point. This is your coarsest safe espresso starting point.
- Run 30–50 grams of “seasoning” beans through the grinder at this setting and discard the grounds. New burr surfaces benefit from a break-in period during which the micro-rough cutting surfaces wear to their working profile.
The detailed procedure for upper burr adjustment and zero-point setting is covered in the Upper Burr Adjustment Guide, which includes tolerances and troubleshooting for collar misalignment after installation.
Post-Replacement Performance
Expect a brief break-in period of 100–200 grams of coffee before new burrs reach their optimal cutting performance. During this period, grind consistency may be slightly less uniform than expected. This is normal; the burr surfaces are polishing to their working profile. After the break-in period, dial in your grind setting from scratch. New burrs will almost certainly require a different setting than the previous worn set, and attempting to use the old setting without re-dialing will produce over- or under-extracted espresso.