The grind setting on the Breville BES870XL is not simply a number on a dial; it is a physical measurement of the gap between two conical burr surfaces, expressed in relative terms through a calibrated collar system. When that calibration drifts, or when the zero point is never properly established after installation or a deep clean, every extraction built on top of it is compromised from the start. Understanding the upper burr adjustment mechanism, how it works, when it needs attention, and how to set it correctly is one of the highest-leverage maintenance skills a BES870XL owner can develop.
UNDERSTANDING THE BES870XL BURR ADJUSTMENT MECHANISM
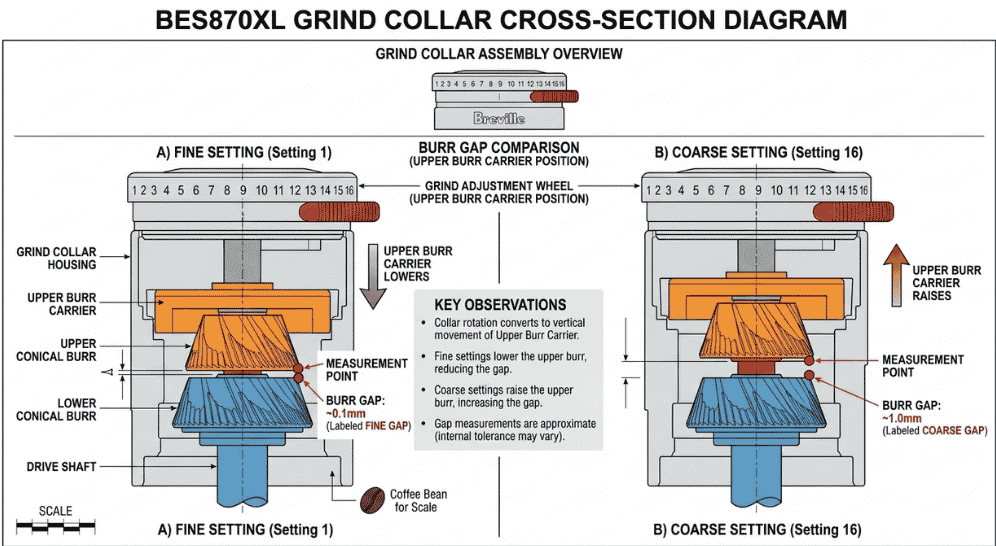
The BES870XL grind size system operates through a threaded adjustment collar that raises or lowers the upper burr carrier relative to the fixed lower burr. As the collar is rotated clockwise (toward the finer setting), the upper burr descends toward the lower burr, reducing the gap through which coffee passes. Counterclockwise rotation raises the upper burr, increasing the gap and producing a coarser grind.
This gap, measured in fractions of a millimeter, determines the particle size distribution of the resulting grounds. For espresso, the optimal gap produces particles predominantly between 200 and 400 microns, with a controlled spread of fines that contributes to body and crema. Even a single collar position shift (roughly 25 to 50 microns of gap change on the BES870XL) can move extraction time by 5 to 10 seconds and alter the sensory profile of the shot significantly.
The grind size scale printed on the collar (typically 1 through 11 or 1 through 16 depending on production variant) is relative, not absolute. The numbers communicate position relative to the mechanical zero point, the position where the two burr surfaces just make contact. If the zero point has shifted, the numbered scale is no longer a reliable reference, and calibration is required before the scale becomes meaningful again.
WHEN DOES THE UPPER BURR NEED ADJUSTMENT?
The upper burr does not require adjustment on a routine schedule, the way cleaning does. Adjustment is triggered by specific events or symptoms:
After Burr Replacement
New burrs require zero-point calibration. The new burr surfaces seat at a slightly different height than the worn burrs they replace, which shifts the entire numbered scale. Without recalibration, the previous setting number will not produce the same extraction time.
After a Deep Clean
Removing and reinstalling the upper burr carrier during a deep cleaning session disturbs the collar position. Even a slight rotational change during reinstallation can shift the effective grind setting by one to two collar positions. A recalibration check is recommended after any cleaning that involves burr carrier removal.
After Dropping or Jarring the Machine
The BES870XL grind adjustment collar is held in position by thread friction and, on some production variants, a light spring detent. A significant physical shock can cause the collar to rotate slightly from its calibrated position.
When Extraction Time Has Drifted Without Changing Settings
If extraction time on a dialed-in setup has drifted by more than 3 to 5 seconds without any change to dose, grind setting, or tamping technique, the collar may have moved. This is particularly common on machines that experience thermal cycling from heavy daily use, which can relax the thread friction over time.
When the Finest Usable Settings Seem Coarser Than Expected
If settings at the fine end of the scale are not producing the restriction expected for espresso, the zero point has likely shifted coarser, meaning the burrs are no longer making contact at position 1. The entire working range of the scale has shifted, and the finest effective espresso setting may now be at a higher number than it should be.
THE ZERO-POINT CALIBRATION PROCEDURE
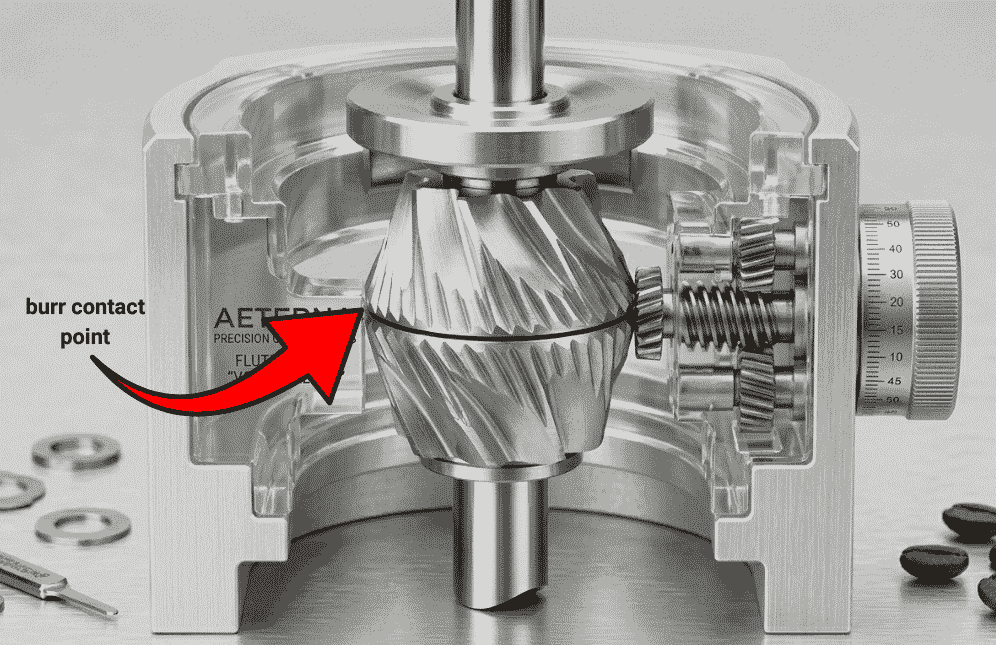
Zero-point calibration establishes the position where the upper and lower burr surfaces first contact each other. This contact point is the mechanical zero from which all grind settings are measured. Everything above this point is a positive gap; the scale numbers represent how many collar increments of gap exist above zero.
Calibrating the BES870XL zero point requires a running grinder; never attempt to find the contact point with the machine unplugged, as the burrs can be forced into contact and damaged.
Step 1 – Preparation
Empty the bean hopper completely. Remove any beans from the grinding chamber by running the grinder briefly with the hopper removed to expel remaining material. Having no beans present allows the burr contact sound to be heard clearly without being masked by grinding noise.
Step 2 – Slow Approach to Contact
With the machine plugged in and the grinder running (use the manual grind mode by holding the grind button), begin rotating the grind size collar very slowly clockwise, toward the finest setting. Use deliberate, single-increment movements; do not spin the collar quickly. The goal is to hear the precise moment when the burr surfaces begin to make contact.
Step 3 – Identifying the Contact Sound
Burr contact produces a distinct metallic clicking, scraping, or hissing sound that is audible over the motor noise. On a healthy BES870XL, this sound will begin intermittently (as the rotating lower burr makes contact with the stationary upper burr at the closest point of each revolution) before becoming continuous as the collar is tightened further.
The first appearance of this intermittent contact sound is the zero point. Do not continue tightening once contact is heard; sustained burr-on-burr contact causes premature wear and can score the burr surfaces.
Step 4 – Marking the Zero Point
Note the collar position number at which first contact is heard. On a properly calibrated BES870XL, this should be at or very near the “1” position. If contact is occurring at position 3, 4, or higher, the collar has shifted coarser, and the zero point needs to be reset by loosening the collar locking mechanism (if present) and re-indexing the collar.
Step 5 – Setting the Working Range
From the zero contact point, rotate the collar counterclockwise (coarser) by 1.5 to 2 full numbered positions. This is the coarsest safe fine grind position, a reasonable starting point for espresso dialing. From here, use standard extraction dial-in technique (adjusting setting and measuring extraction time against a 1:2 ratio target) to find the optimal espresso setting.
ADJUSTING FOR GRIND CONSISTENCY, NOT JUST SPEED
A common misunderstanding of the BES870XL grind setting is that a single “correct” number exists for any given coffee. In practice, the optimal setting changes with every new bag of coffee, with variations in ambient humidity, with bean age, and even with changes in tamping pressure. The upper burr adjustment creates the framework within which these variables operate, not a fixed solution to extraction.
Once the zero point is correctly calibrated, use the following principles to maintain consistent grind performance:
Adjust Only While Running
Grind size adjustments must be made while the grinder is in operation. Adjusting a stationary grinder risks tightening the collar past the burr contact point, causing the jam scenario described in the Breville BES870XL Grinder Jammed? Easy Fix Guide, where the motor cannot overcome the load at startup.
Make Single-Increment Adjustments
Each collar increment on the BES870XL changes extraction time by approximately 3 to 7 seconds under typical espresso conditions. When dialing in, move one increment at a time and pull a test shot before making another adjustment. Multi-increment jumps make it easy to overshoot the target range.
Account for Burr Seasoning After Replacement
New burrs take approximately 100 to 200 grams of coffee to reach their operational profile. During this period, the effective gap at any given setting will change slightly as the burr surfaces polish. Expect to fine-tune the collar position several times during the first week after a burr replacement.
DIAGNOSING ADJUSTMENT COLLAR PROBLEMS
Collar Too Tight to Turn
If the grind size collar has become very difficult to rotate, the threads may have accumulated compacted grounds. Never force a stuck collar; this can crack the housing or strip the threads. Instead, run a grinder cleaning tablet cycle to loosen and absorb the compacted material, then attempt adjustment again. For details on the correct cleaning sequence, see the guide on How to Clean Breville BES870XL Burr Grinder Properly.
Collar Slipping or Not Holding Position
If the collar rotates freely and does not hold a set position, the thread friction is insufficient either because the threads are worn, contaminated with oil, or the spring detent (on machines with this feature) has weakened. Cleaning the threads thoroughly and running dry (without oil or grease) will often restore sufficient friction. Persistent slipping indicates thread wear and may require collar replacement.
Collar Position Does Not Match Expected Extraction
If position 7 was dialing in perfectly last week and now produces wildly different results, and no beans have changed, check whether the zero point has shifted. A zero-point recalibration following the procedure above will re-anchor the scale before further dialing attempts.
MAINTAINING CALIBRATION OVER TIME
On a well-maintained BES870XL, the zero point should remain stable for weeks to months between calibration checks. The main factors that accelerate calibration drift are: frequent cleaning that involves burr carrier removal, heavy daily use that causes thermal cycling in the collar threads, and using beans with significant chaff or debris that works into the collar thread mechanism.
Incorporate a zero-point check into the regular burr replacement procedure, and re-verify calibration any time extraction time shifts by more than 5 seconds without an identifiable cause. With this approach, the BES870XL’s adjustment system remains a precise and reliable tool rather than an approximate one.