Grind quality is the single most important variable in espresso extraction, and grind quality degrades silently over time when the burr grinder is not cleaned properly. On the Breville BES870XL, stale oil residue from coffee beans accumulates on the burr surfaces, inside the grinding chamber, and within the grounds delivery chute. This residue turns rancid within days and begins to contaminate every subsequent dose with off-flavors, a phenomenon most users incorrectly attribute to bad beans or incorrect extraction parameters.
Why Burr Grinder Cleaning Matters More Than Most Users Realize
Coffee beans contain natural oils, primarily chlorogenic acid lactones, diterpenes like cafestol and kahweol, and volatile aromatic compounds. When these oils contact metal burr surfaces and sit at room temperature, they oxidize. Within 24 to 48 hours, oxidized coffee oil takes on a distinctly rancid, stale character that transfers directly to the grounds and, subsequently, to the espresso shot.
On a low-usage machine (one to two shots per day), buildup accumulates relatively slowly. On a higher-usage machine, the grinding chamber and delivery chute can accumulate enough oily residue to noticeably affect flavor within a week of skipping cleaning. Beyond flavor, dirty burrs affect grind consistency. Oil-coated burr teeth do not cut coffee cell walls cleanly; they smear and tear, producing a wider particle size distribution that leads to uneven extraction and channeling.
Tools Required for Proper Cleaning
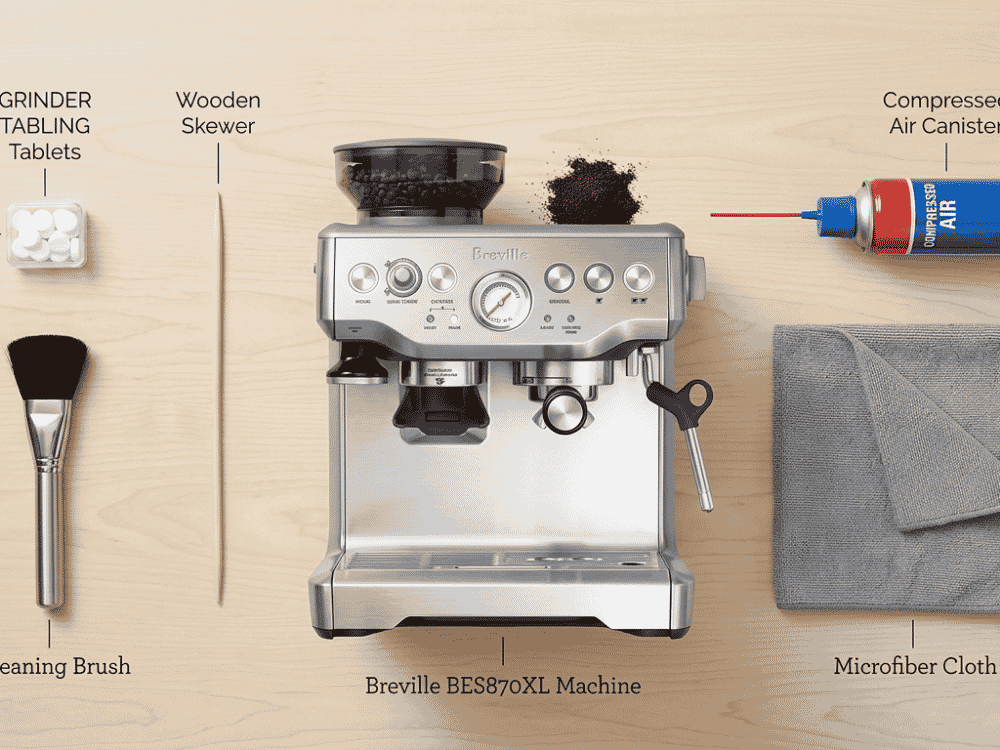
- Breville cleaning brush (included with the machine) or a stiff-bristled pastry brush
- Wooden or plastic skewer or pipe cleaner
- Grinder cleaning tablets (Urnex Grindz or equivalent)
- Mild dish soap and warm water
- Dry microfiber cloths
- Compressed air canister (optional but highly effective)
Important:
Never use water directly inside the grinding chamber or on the burrs themselves. Never use metal tools to scrape the burr teeth. Never use detergent inside the grinding chamber or on the burr surfaces.
Daily Cleaning: The 60-Second Routine
After each grinding session, use the included cleaning brush to sweep loose grounds out of the visible portions of the grinding chamber. Pay particular attention to the area around the upper burr collar and the grounds chute outlet at the bottom of the chamber. This step does not clean the burr surfaces themselves, but it removes the surface layer of loose grounds before they have time to compact and adhere. On the BES870XL, the portafilter cradle area also accumulates grounds. Wipe this with a dry cloth after every session.
Weekly Cleaning: Grinder Cleaning Tablets
Once per week (or after every 250 grams of coffee on heavier-use machines), run a grinder cleaning tablet through the BES870XL grinding system. Urnex Grindz tablets are the most widely recommended option and are formulated specifically for espresso machine grinders.
- Empty the bean hopper completely and brush out any remaining whole beans.
- Place the recommended number of tablets (typically 20–30 grams) directly into the empty hopper.
- Set the grind size to the medium position.
- Set the grind amount dial to a high value.
- Run the grinder and allow the tablets to pass fully through the system.
- Follow immediately with a 30-gram dose of your regular coffee beans to purge any tablet residue.
- Discard the purge grounds; do not use them for brewing.
Monthly Deep Clean: Burr Removal and Manual Cleaning
The most thorough cleaning the BES870XL grinder can receive involves removing the upper burr assembly, manually cleaning both burr faces, and brushing the interior grinding chamber walls. This procedure takes approximately 20 minutes and should be performed monthly under normal use, or every two weeks if using dark, oily beans.
Upper Burr Removal
- Remove the bean hopper and set it aside.
- Locate the upper burr collar it sits at the top of the grinding chamber.
- Turn the upper burr collar counterclockwise (when viewed from above) to unlock it, then lift it straight out.
- The burr teeth will now be visible on both the conical burr face and the surrounding collar.
Cleaning the Burrs
Use a dry, stiff brush to remove all visible grounds and oil residue from both the upper and lower burr faces. Work in the direction of the burr grooves to avoid pushing debris further into the cutting channels. Do not apply water to the burr surfaces; moisture can cause rust on stainless steel burrs over time and can also cause grounds to cake and harden in the cutting grooves. For particularly heavy oil buildup, a cotton swab very lightly dampened with isopropyl alcohol can be used on the flat burr faces. Allow to dry completely (five minutes minimum) before reassembly.
Cleaning the Grinding Chamber
With the upper burr removed, the interior grinding chamber is fully accessible. Use a cleaning brush and, if available, short bursts of compressed air to remove compacted grounds from the chamber walls. The delivery chute at the bottom of the chamber is a common accumulation point; use a wooden skewer or pipe cleaner to probe this passage and dislodge any compacted material. For persistent blockages in the delivery chute, the detailed procedure in the companion guide on Coffee Grounds Stuck in Grinder Chute provides additional techniques, including hot water flushing of the chute from the portafilter side.
Reassembling the Burr
Seat the upper burr back into the grinding chamber, align the locking tabs with the slots in the collar, and rotate clockwise until the locking click is felt. Before replacing the bean hopper, run the grinder briefly (without beans) to confirm the burr is seated correctly and rotating freely.
Cleaning the Bean Hopper
The bean hopper should be removed and washed with mild dish soap and warm water every two to four weeks. The hopper can accumulate oil residue on its inner walls, which then transfers to fresh beans and accelerates oxidation. After washing, rinse thoroughly and allow it to dry completely for at least several hours before reinstalling. Any residual moisture inside the hopper can cause beans to clump and block the feed port. Also check the hopper’s gasket seal at the base; a worn or cracked gasket allows air to enter the hopper, which accelerates bean staling. Replace the gasket if it shows cracking or has lost its elasticity.
Cleaning the Grind Settings Collar
The grind size adjustment collar on the BES870XL is calibrated in numbered positions. Over time, fine ground dust accumulates in the threads of this collar. Use a dry brush to clean the collar threads during each monthly deep clean. Do not apply lubricants to the adjustment collar. Grease or oil in this area will mix with the grounds and accelerate clogging. If the adjustment collar has become difficult to turn, it may be over-tightened or have compacted grounds in the threads. For a detailed guide on collar adjustment and burr repositioning, refer to the Upper Burr Adjustment Guide, which covers the correct technique for resetting the zero point after a deep clean.
Reassembly and Post-Clean Calibration
After a monthly deep clean, the grind size calibration may shift slightly because the burr collar has been disturbed. Before pulling a production shot, run two or three calibration doses through the grinder at your usual setting, discard the grounds, and adjust as needed. This recalibration step is important because even small variations in burr position after reassembly will affect dose weight and extraction time. Allow the grinder to settle over the first few doses following a deep clean before making final adjustments.
Cleaning Frequency Summary
| Component | Recommended Frequency |
| Portafilter cradle wipe | After every session |
| Grounds brush-through | After every session |
| Grinder cleaning tablets | Weekly / every 250g of coffee |
| Bean hopper wash | Every 2–4 weeks |
| Full burr removal and cleaning | Monthly |
| Delivery chute deep probe | Monthly |