The solenoid valve is one of the most mechanically sophisticated and functionally critical components in the Breville BES870XL water circuit. Unlike the pump, which simply moves water, or the thermocoil, which heats it, the solenoid valve actively manages where water goes within the machine at each stage of the brewing cycle. When it fails, the consequences extend across the entire extraction process: from zero water flow to residual pressure problems, to mysterious dripping after shots are complete. Yet the solenoid valve is also among the most frequently misdiagnosed components on the BES870XL, because its failure symptoms overlap with those of the pump, the group head, and the control board.
This guide builds the knowledge framework needed to correctly identify solenoid valve problems, distinguish them from other failures, clean a blocked valve, and replace the assembly when cleaning is insufficient.
WHAT THE BES870XL SOLENOID VALVE DOES
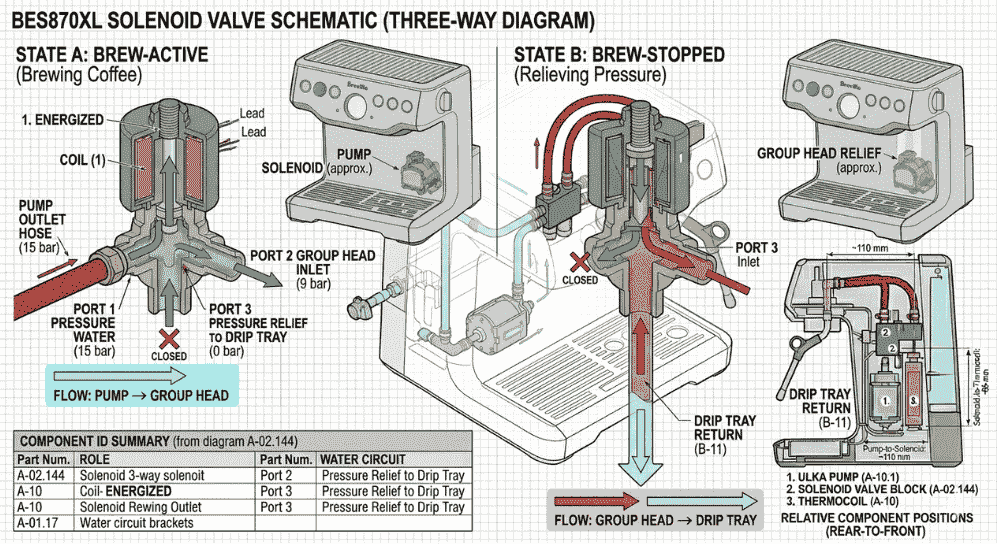
The BES870XL uses a three-way solenoid valve positioned between the pump output and the group head. “Three-way” refers to the valve’s three ports:
Port 1 – Inlet: receives pressurized water from the pump.
Port 2 – Outlet to group head: delivers pressurized water to the thermocoil and group head during brewing.
Port 3 – Pressure relief: opens when the brew cycle ends to release residual pressure from the group head, routing depressurized water to the drip tray.
During a brewing cycle, the solenoid coil is energized by the control board, which drives a metal plunger against spring pressure to open the flow path from port 1 to port 2. When the brew cycle ends, the coil de-energizes, the spring returns the plunger, the port-1-to-port-2 path closes, and the port-2-to-port-3 path opens, simultaneously releasing the pressure trapped in the group head. This simultaneous closure and relief is what produces the characteristic “thud” sound at the end of every BES870XL extraction.
This three-way pressure management function is not merely a convenience feature. It actively depressurizes the saturated coffee puck after extraction, which prevents the portafilter from being removed under pressure and significantly reduces channeling in the puck — contributing to consistent shot quality.
SOLENOID VALVE FAILURE MODES
The BES870XL solenoid valve can fail in four distinct ways, each producing a different symptom pattern:
Failure Mode 1 – Coil Failure (Open Circuit)
The solenoid coil burns out or breaks internally, preventing the electromagnetic field from forming. The plunger cannot be actuated, and the valve remains permanently closed. This produces complete cessation of water flow during extraction, despite the pump running normally; no water reaches the group head regardless of pump operation. This is distinguishable from a pump failure because the pump noise is present and normal; the difference is in the valve response downstream.
Failure Mode 2 – Scale-Blocked Plunger (Stuck Closed or Restricted)
Mineral scale deposits on the valve seat, around the plunger, or within the valve body prevent the plunger from moving freely, even when the coil is energized. The result is reduced or absent flow during extraction. Unlike coil failure, a scale-blocked valve may produce partial flow at reduced pressure rather than complete zero flow.
Failure Mode 3 – Debris-Blocked Valve Seat (Leaking or Dripping)
Fine debris, scale fragments from a recently descaled machine, silicone hose particles, or mineral deposits can lodge between the valve seat and the plunger, preventing complete closure. This produces water leaking or dripping from the group head after the brew cycle has ended, and can cause over-extraction in subsequent shots if the machine is left idle with residual flow.
Failure Mode 4 – Relief Port Blockage (Failed Depressurization)
If the relief port (Port 3) becomes blocked by scale, the valve cannot depressurize the group head at the end of the brew cycle. The characteristic end-of-shot thud is absent. Residual pressure remains in the group head, making portafilter removal difficult or unsafe and causing the puck to remain over-saturated. This can also mask as a portafilter leaking symptom.
DIFFERENTIAL DIAGNOSIS: SOLENOID VALVE VS. OTHER COMPONENTS
The symptoms of solenoid valve failure overlap with pump failure and group head problems. The following distinguishing tests help isolate the correct component:
Test 1 – Confirm Pump Is Running
If no water reaches the group head during extraction, confirm the pump is operating. Listen for the pump’s characteristic oscillating sound during the brew cycle. If the pump is silent, the fault is electrical and upstream of the pump (control board, thermal fuse, or main switch). If the pump is audible, water is being pressurized and the blockage is downstream, likely the solenoid valve.
Test 2 – Listen for the End-of-Cycle Thud
At the end of every normal BES870XL extraction, a distinct mechanical thud occurs as the solenoid closes and the relief port opens. If this sound is absent, the solenoid is not completing its cycle. This can indicate coil failure (valve never opened) or relief port blockage (valve cannot complete the pressure relief function).
Test 3 – Check for Post-Cycle Dripping
If water continues to drip from the group head for more than a few seconds after the brew cycle ends, the solenoid valve is not closing completely. This is debris-in-valve-seat failure mode 3 above.
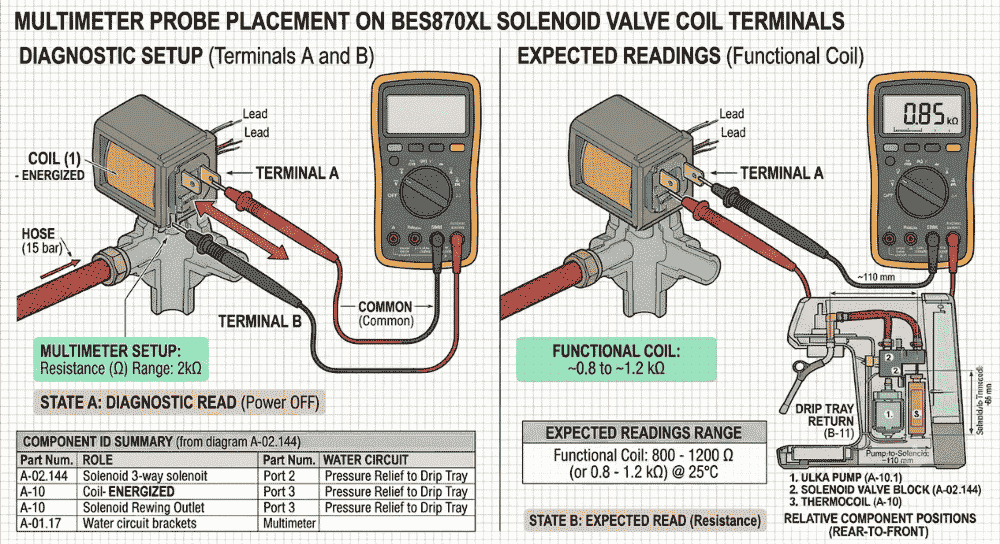
Test 4 – Measure Coil Resistance
Disconnect the electrical connections from the solenoid coil and measure resistance across the coil terminals with a multimeter set to the ohm range. A functional BES870XL solenoid coil measures approximately 300 to 500 ohms. An open circuit reading (infinite resistance, or “OL” on a digital meter) confirms coil failure. A resistance reading near zero suggests a shorted coil.
CLEARING A SCALE-BLOCKED SOLENOID VALVE
A solenoid valve blocked by mineral scale can sometimes be restored to function without full replacement. This procedure requires partial machine disassembly to access the valve body directly.
Step 1 – Machine Preparation
Unplug the machine and allow it to cool completely. Empty and remove the water tank. Lay the machine on its side on a protected work surface.
Step 2 – Access the Valve
Remove the machine’s outer panels as described in the Water Pump Replacement guide. The solenoid valve is located in the water circuit between the pump outlet and the thermocoil inlet, typically mounted against the rear or lower chassis wall. The valve body is cylindrical (approximately 30 to 40mm diameter, 50 to 60mm length) with the coil assembly visible as an outer sleeve over the valve body.
Step 3 – Remove the Valve Body from the Circuit
Disconnect the electrical connections from the coil. Using slip-joint pliers, loosen the compression fittings or hose clamps on the inlet and outlet ports. Prepare for water drainage. Remove the valve from its mounting bracket.
Step 4 – Disassemble the Valve Body
The solenoid valve body can be disassembled by unscrewing the end cap opposite the coil. Inside, the plunger, plunger spring, and valve seat are accessible. Remove the plunger carefully and inspect the valve seat and plunger face for mineral deposits.
Soak the valve body, plunger, and valve seat in a citric acid descaling solution (50 grams of citric acid in 500ml warm water) for 30 to 60 minutes. This dissolves calcium carbonate scale without damaging the brass valve body or the rubber seat seal.
After soaking, rinse thoroughly with clean water and check that the plunger moves freely within the valve body. Reassemble the valve, confirming the plunger spring is seated correctly.
Step 5 – Reinstall and Test
Reinstall the valve in the circuit, reconnect hoses and electrical connections, and run a test extraction cycle. If flow is restored to normal pressure and the end-of-cycle thud returns, the cleaning was successful.
SOLENOID VALVE REPLACEMENT PROCEDURE
If coil testing confirms an open circuit, or if cleaning does not restore normal valve function, full replacement is required.
Sourcing the Correct Valve
The BES870XL uses a standard 3/8-inch three-way solenoid valve rated for 120V/60Hz (North American) or 220-240V/50Hz (international). These are generic industrial components available from espresso machine parts suppliers. When ordering, confirm: voltage rating, port sizing (3/8 inch BSP typically), and three-way configuration.
Replacement follows the same disassembly sequence as the cleaning procedure above. When installing the replacement valve, confirm port orientation matches the original installation. The inlet port must connect to the pump outlet hose, and the outlet port must connect to the thermocoil inlet hose. Reversed connections will result in no flow or backflow.
A critical note: after any solenoid valve work, whether cleaning or replacement, run three to four full extraction cycles without coffee before pulling a production shot. This ensures that any debris disturbed during the repair, any residual descaling solution, or any installation debris has been fully flushed from the circuit.
SOLENOID VALVE AND ELECTRICAL CIRCUIT INTERACTIONS
The solenoid valve draws a brief current spike at the moment of energization that is managed by the BES870XL’s control board. A valve with a failing or shorted coil can in some cases, create electrical disturbances that affect the control board, including tripping GFCI outlets and causing unexpected machine shutdowns. If the machine is experiencing electrical tripping behavior alongside extraction problems, both the solenoid valve and the pump (the two major electromagnetic loads on the control circuit) should be evaluated as potential sources.
For ongoing reliability, the solenoid valve benefits from the same scale management practices that protect the pump and thermocoil: regular descaling prevents mineral accumulation in the valve seat and plunger bore, and using filtered water reduces the rate of scale formation significantly. A machine on filtered water typically shows minimal solenoid issues even after years of operation. A machine on very hard, unfiltered water may require solenoid cleaning within two to three years of installation. How to descale Breville BES870XL properly guide provides the correct interval and procedure for the BES870XL’s descaling program.
THE SOLENOID VALVE IN THE BROADER HYDRAULIC CONTEXT
Understanding the solenoid valve’s role makes it clear why its failure affects so many aspects of the machine’s performance simultaneously. Low extraction pressure, post-cycle dripping, absent puck depressurization, and complete extraction failure are all symptoms that can trace to a single three-way valve that many owners never know exists.
Correctly diagnosing solenoid valve problems rather than reflexively replacing the pump when the extraction pressure drops saves both money and time. The solenoid valve is a less expensive component than the pump, accessible with moderate disassembly effort, and often restorable to full function with a cleaning procedure that requires no new parts at all.