The water pump is the hydraulic heart of the Breville BES870XL. Every function that requires water movement pre-infusion, full extraction pressure, steam boiler replenishment, and the cleaning cycle depends on the pump operating correctly. When the pump fails, the machine does not simply underperform: it stops functioning as an espresso machine entirely. Pump failure is one of the most common component failures on the BES870XL at the three-to-five year mark, and it is a repair that a competent home technician can complete successfully with the right preparation.
This guide covers the complete pump replacement procedure from identifying that the pump has actually failed (rather than a related component), through sourcing the correct replacement, through the full disassembly and reassembly sequence, through post-installation testing.
UNDERSTANDING THE BES870XL PUMP SYSTEM
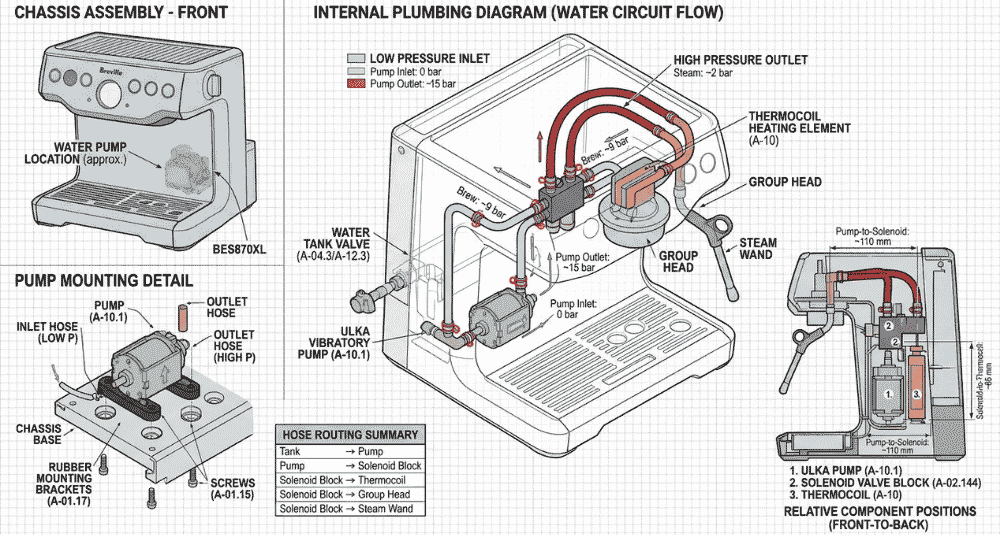
The BES870XL uses a vibratory pump, specifically, an electromagnetic oscillation pump in which an electromagnet alternately attracts and repels a spring-loaded piston inside a cylindrical chamber. Each cycle of this piston draws water in through the inlet check valve and forces it out through the outlet check valve, creating pressure pulses that combine into a near-continuous flow at the required pressure (nominally 9 bar at the group head, with a total pump output of 12 to 15 bar before the over-pressure valve reduces it to the working pressure).
The pump is connected to the water circuit via two silicone hoses the inlet hose drawing from the water tank, and the outlet hose delivering pressurized water to the thermocoil or boiler. It is also connected to mains power via the control board, which manages pump operation timing.
Vibratory pumps on the BES870XL are not serviceable in the traditional sense, individual piston components are not available as spare parts, and the pump cannot be reliably rebuilt at home. When the pump fails, the entire unit is replaced as an assembly.
CONFIRMING PUMP FAILURE: DIFFERENTIAL DIAGNOSIS
Before committing to a pump replacement, it is important to confirm that the pump itself has failed and not a related component. Several other issues can produce pump-like symptoms:
The machine produces no flow and no pump sound: This suggests electrical failure upstream of the pump, a control board fault, a blown thermal fuse, or a wiring break between the board and the pump. Confirm by measuring voltage at the pump terminals while the machine is attempting to run; if no voltage is present, the fault is in the control circuit, not the pump.
The machine produces no flow, but the pump is audible and running: The pump is mechanically functional, but the flow is obstructed. Possible causes include: a blocked intake screen on the pump inlet, a collapsed intake hose, a seized or blocked solenoid valve preventing water movement, or a severely scaled internal water circuit. Before replacing the pump, confirm that the solenoid valve is operating correctly. See the Breville BES870XL Solenoid Valve Replacement & Troubleshooting Guide for solenoid diagnostics.
The machine produces weak flow but not zero flow: Partial pump failure, a worn or damaged piston seal, or a partially blocked water circuit. Descaling should be performed before pump replacement if the machine has not been descaled within the past six months, as scale deposits can reduce flow to a fraction of the pump’s rated capacity.
The machine produces intermittent flow: Intermittent pump failure is often caused by a failing pump capacitor (the capacitor that provides the starting current spike for the electromagnetic piston). Capacitor replacement is significantly cheaper than pump replacement and should be tested first if the pump runs sometimes but not others.
If after these checks the pump is confirmed as the failed component running but producing no pressure, or silent and not responding to electrical input, proceed with replacement.
SOURCING THE CORRECT REPLACEMENT PUMP
The BES870XL uses a ULKA EAP5 or ULKA EP5 pump (either 120V/60Hz for North American machines or 220-240V/50Hz for international variants). These are industry-standard vibratory pumps used across a wide range of home espresso machines from Breville, DeLonghi, Saeco, and others.
Before ordering:
Confirm the voltage: Match the replacement pump voltage to the machine’s rated voltage (printed on the base plate). Installing a 220V pump in a 120V machine will result in insufficient pump power; installing a 120V pump in a 220V machine will immediately burn out the pump.
Confirm the port orientation: The ULKA EP5 is available in straight-line (inlet and outlet ports in line) and angled port variants. The BES870XL uses the straight-line variant. Confirm with the pump removed from the machine before ordering a replacement if uncertainty exists.
Confirm the connector type: The pump receives its electrical connection via spade or bullet-style terminals. The replacement pump must use the same connector format as the original, or compatible adapters must be sourced.
TOOLS REQUIRED
– Phillips-head screwdriver (PH2)
– Flat-head screwdriver (small)
– Hose clamp pliers or slip-joint pliers
– Container for water drainage
– Towels and drip protection
– Multimeter (for electrical verification)
– New pump and fresh silicone hose clamps (recommended)
STEP 1: PREPARE THE MACHINE
Unplug the BES870XL from the wall outlet. Allow the machine to cool for at least 30 minutes if it has been recently used; the thermocoil and any water in the boiler circuit retain significant heat and can cause burns during disassembly.
Empty the water tank completely and remove it from the machine. Place the machine on a stable work surface covered with towels to catch any residual water in the internal plumbing. Have a container available to catch water during hose removal.
STEP 2: REMOVE THE OUTER CASING
The BES870XL chassis is secured by screws on the rear panel and, depending on the production variant, on the underside. Remove all visible Phillips-head screws from the rear face of the machine and from the bottom panel.
The top panel must also be removed to allow the side panel to be freed. On most BES870XL variants, the top panel is secured by two to four screws accessible after removing the bean hopper. Remove these screws and lift the top panel clear.
With the top and rear screws removed, the right-side panel can typically be freed and removed to access the internal chassis. On some production variants, both side panels must be removed for full pump access. Consult the service diagram for the specific production year of the machine if the access path is not immediately clear.
STEP 3: LOCATE AND DISCONNECT THE PUMP ELECTRICALLY
The pump is mounted inside the chassis on a rubber vibration-damping bracket. It is typically located in the lower-front area of the machine, between the water tank bay and the group head.
Before touching any hose connections, disconnect the pump’s electrical terminals. The pump receives two spade or bullet-terminal connections from the control wiring harness. Pull these terminals straight off the pump tabs. Do not twist or pry sideways, as this can damage the pump terminal tabs and complicate the installation of the replacement.
Label or photograph the terminal positions if any uncertainty exists about which wire connects to which terminal. On most vibratory pumps, polarity does not matter (they are AC devices), but confirming before disconnection prevents confusion during reassembly.
STEP 4: DISCONNECT AND REMOVE THE HOSES
Place a towel or shallow container beneath the pump. Using hose clamp pliers, compress the clamps on the inlet and outlet hoses and slide them back along the hose (away from the pump connection point). With the clamps loosened, pull each hose off the pump’s barbed port fittings. Expect water to drain from both hoses. The inlet hose will have residual water from the tank circuit, and the outlet hose may have water under some residual pressure from the circuit.
Inspect the hose ends after removal. If the hose interior shows cracking, hardening, or discoloration at the connection point, the hose should be replaced along with the pump. A deteriorated hose on a new pump will fail within months and require reopening the machine; it is efficient to replace them simultaneously.
STEP 5: UNMOUNT THE PUMP FROM ITS BRACKET
The pump is mounted in a rubber isolating bracket that dampens vibration. This bracket may be secured by a single screw, a clip, or simple friction, depending on the production variant. Remove the mounting fastener and lift the pump clear of the bracket.
Retain the rubber mounting bracket for use with the new pump unless it is visibly cracked, hardened, or deformed. The bracket is important; mounting the pump directly to the metal chassis without isolation transmits vibratory noise through the entire machine structure, significantly increasing operational noise.
STEP 6: INSTALL THE REPLACEMENT PUMP
Seat the new pump into the existing rubber mounting bracket in the same orientation as the original pump. Confirm the inlet port (marked “IN” on ULKA pumps) is oriented toward the water tank circuit hose, and the outlet port is oriented toward the boiler or thermocoil circuit hose.
Secure the mounting bracket fastener if applicable.
Connect the hoses to the new pump’s barbed port fittings, pressing firmly until the hose is fully seated over the barb. Slide the hose clamps back into position directly behind the pump fittings (not further along the hose). Confirm each clamp is positioned to grip the hose against the barb, not over the smooth hose body.
Reconnect the electrical terminals to the pump. If the original terminals showed signs of corrosion or heat discoloration, clean them with a small amount of electrical contact cleaner and ensure a tight mechanical fit.
STEP 7: REASSEMBLE AND TEST
Before closing the machine, perform a preliminary water test with the side panel open. Reinstall the water tank with a full tank of fresh water. Plug the machine in and run a full water flush cycle (no coffee, portafilter with empty basket, machine in brew mode). Observe the pump area for leaks at both hose connections and at the pump body.
If no leaks are present after a full tank flush, unplug the machine, complete the panel reassembly, and perform a final functional test. Run the machine through its full startup sequence and pull an extraction shot to verify pressure is within normal range and flow rate is consistent.
For ongoing pump health, the most important preventive measure is regular descaling. Scale deposits in the water circuit increase the resistance the pump works against, accelerating wear on the piston seal and shortening pump service life. For the correct descaling procedure and interval for the BES870XL, see the companion guide on How to descale Breville BES870XL properly.
POST-REPLACEMENT PERFORMANCE EXPECTATIONS
A new ULKA EP5 pump in a BES870XL that is otherwise in good condition should produce pump noise that is noticeably lower and more regular than a failing pump. The extraction pressure gauge (if the machine has one) should reach the 9-bar espresso zone reliably. First-shot extraction times should fall within the normal range without adjustment to grind settings.
If extraction pressure remains low after pump replacement, the issue is downstream of the pump, likely in the solenoid valve, the over-pressure valve, or the water circuit scale, and those components should be investigated separately.