The nylon pre-filter on the Levoit Core 200S is the only component in the entire filtration system that is washable and reusable. Every other filtration layer, the H13 HEPA fiber mat and the activated carbon sheet, must never be wetted and are replaced as a complete assembly when they reach capacity. The nylon pre-filter, by contrast, is designed to be washed repeatedly throughout the filter’s service life, and doing so correctly is one of the highest-leverage maintenance actions available for Core 200S owners.
Understanding why the pre-filter matters mechanically, not just that it “needs cleaning” but how its loading state directly affects CADR, HEPA service life, and motor load, makes the washing routine feel purposeful rather than merely procedural.
WHY PRE-FILTER CLEANING IS MORE IMPACTFUL THAN MOST OWNERS REALIZE
The nylon pre-filter is the outermost surface of the Core 200S filter assembly. Every cubic foot of air drawn into the unit must pass through this mesh layer before reaching the HEPA and carbon layers. This means the pre-filter accumulates the full particle load of everything the purifier processes, including pet hair, dust, lint, dander, and large debris, before any of it reaches the HEPA layer.
When the pre-filter mesh becomes loaded with this material, the effective open area of the mesh decreases. Airflow through the system is governed by the total pressure drop across all three filter stages. A heavily loaded pre-filter significantly increases this pressure drop, which:
1. Reduces the total volume of air the fan can draw through the system, directly lowering CADR
2. Increases the electrical load on the motor; the fan works harder to maintain the same airflow against higher resistance
3. Accelerates HEPA loading because the pressure differential forces air through the HEPA layer at higher velocity, which can slightly reduce capture efficiency and increase mechanical stress on the HEPA fibers
Conversely, a clean pre-filter maintains low system pressure drop, which keeps CADR near the rated specification, reduces motor load, and allows the HEPA and carbon layers to reach their full service life before requiring replacement.
The quantifiable effect
Independent testing of similar cylindrical pre-filter designs has shown that a pre-filter loaded to its practical dirt capacity increases system pressure drop by 20 to 40% relative to a clean filter at comparable conditions. For the Core 200S, this translates to a CADR reduction of 15 to 25%, a meaningful performance decline that washing the pre-filter immediately reverses.
HOW THE PRE-FILTER IS ATTACHED TO THE FILTER ASSEMBLY
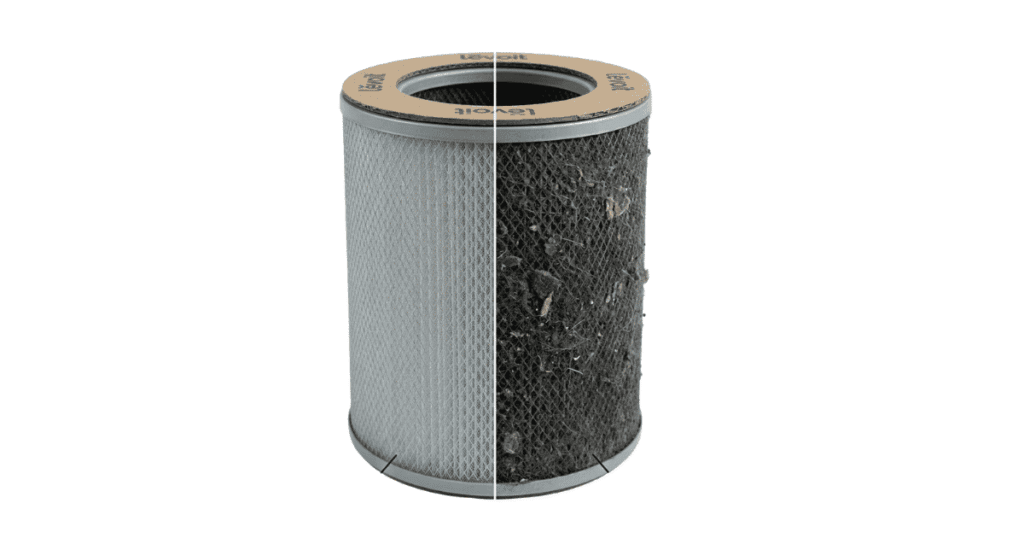
On the Core 200S, the nylon pre-filter is the outer surface of the cylindrical filter assembly. It is not a separately removable layer on most production variants; it is the woven nylon mesh that covers the outer cylindrical surface of the entire filter unit.
This means cleaning the pre-filter requires working with the filter assembly itself, not a separate removable cover. The filter assembly must be removed from the machine for cleaning, and only the nylon outer surface is washed. The HEPA and carbon layers inside the filter cylinder must be kept completely dry throughout the process.
Some later Core 200S production variants feature a separately removable nylon pre-filter cover that slips over the filter cylinder. If your unit has this design, the pre-filter can be removed independently for washing without handling the inner filter. Check your specific production variant before the first cleaning.
WHAT NOT TO DO: CRITICAL WARNINGS BEFORE WASHING
Understanding what will damage or ruin the filter assembly is as important as the washing procedure itself.
Do not submerge the filter assembly in water. Only the outer nylon mesh surface should contact water. Submerging the filter allows water to penetrate the HEPA fiber mat and the activated carbon layer, both of which are permanently damaged by saturation. A wet HEPA mat does not dry to its original condition; the fibers mat together, reducing the effective filtration area and altering airflow characteristics.
Do not use a washing machine or dishwasher. The mechanical agitation and hot water temperature will damage the nylon mesh and, more critically, will saturate the inner filter layers.
Do not use any soap, detergent, or cleaning chemicals on the pre-filter mesh. Surfactants left in the nylon mesh after rinsing can be drawn into the room air during operation. Residual cleaning chemicals can also degrade the nylon fibers over multiple washes. Plain water is sufficient; the pre-filter captures physical debris, not chemical contamination.
Do not reinstall the filter while the pre-filter mesh is wet or even damp. A damp filter installed in a running purifier will draw moist air through the HEPA layer, which can create conditions for mold growth in the filter media over time.
STEP-BY-STEP PRE-FILTER CLEANING PROCEDURE
What you need:
- Soft-bristle brush (a clean, soft toothbrush or a small paintbrush works well)
- Lukewarm running water
- Clean dry towels
- A clean, dry, well-ventilated surface for drying
- Vacuum cleaner with a brush attachment (optional, for dry pre-cleaning before washing)
Step 1 – Power off and unplug
Long-press the power button on the Core 200S (2 seconds) to turn it off. Unplug the unit from the wall outlet. Never remove the filter from a running or plugged-in unit.
Step 2 – Access the filter assembly
Hold the upper body of the Core 200S with one hand and rotate the base section counterclockwise approximately 30 degrees until it disengages. Lift the base section downward to separate it from the upper body. Lift the filter assembly straight up and out of the base section.
Step 3 – Dry pre-cleaning (recommended before washing)
Before introducing water, use a vacuum cleaner with a brush attachment on a low suction setting to remove loose surface debris from the nylon mesh. Work systematically around the cylindrical perimeter of the filter assembly, holding the vacuum nozzle close to but not pressed against the mesh. This step removes the loosely attached large debris (pet hair, dust aggregates, lint) without wetting anything and prevents these particles from becoming wet and embedding more deeply into the mesh during washing.
If a vacuum is not available, gently tap the filter assembly against a clean paper towel over a sink to dislodge loose debris before washing.
Step 4 – Wash the pre-filter surface with lukewarm water
Hold the filter assembly vertically and orient it so the nylon mesh surface faces the water stream from the tap. Use lukewarm (not hot) water flowing at moderate pressure. The goal is to direct water flow outward through the mesh (from inside the outer surface toward the exterior) to push debris out through the mesh rather than deeper into it.
Because the filter is cylindrical, rotate it slowly under the water stream to ensure the full 360-degree perimeter is washed. Work from the top of the cylinder to the bottom.
Critical: During this process, keep the open top and bottom ends of the filter cylinder away from the water stream. The water must contact only the nylon outer mesh, not enter the cylinder. Hold the filter horizontally at a slight angle if needed to prevent water from flowing into the open ends.
Step 5 – Brush gently if needed
For areas of the mesh with visible embedded debris that water alone does not dislodge, use a soft-bristle brush in light circular motions along the mesh surface. Do not scrub with pressure; the goal is to agitate debris loose from the mesh openings, not to scour the surface. Excessive pressure can distort the nylon weave.
Step 6 – Rinse
Rinse the outer mesh surface with clean lukewarm water following the same rotation pattern as the initial wash. Confirm that the rinse water running off the mesh is clear (no brown or gray discoloration), which indicates the debris has been fully removed.
Step 7 – Initial water removal
Gently shake the filter assembly downward over the sink three to five times to dislodge water droplets from the mesh surface. Then press a clean, dry towel against the outer mesh perimeter; do not wipe (wiping can push debris back into the mesh), but blot by pressing the towel against the surface and releasing.
Step 8 – Drying: the most critical step
Place the filter assembly upright on a clean, dry surface in a well-ventilated room. Allow it to dry completely and naturally. Do not use a hair dryer, oven, or any heat source. Heat accelerates drying, but can warp the plastic frame and may denature the HEPA fiber mat if any moisture has entered the inner layers.
Complete drying time: at room temperature with normal indoor air circulation, the nylon mesh surface will be surface-dry within 1 to 2 hours. However, the inner filter layers and plastic frame can retain moisture in gaps and seams for 12 to 24 hours. The conservative standard is 24 hours of drying time before reinstallation.
To test whether the filter is completely dry: pass a clean, dry paper towel around the mesh surface and along both end faces if any moisture transfers to the paper towel, drying is not complete.
Step 9 – Reinstall and reset timer
Reinstall the filter assembly in the base section, align the orientation notch, reattach the upper housing, plug in, and power on. If the filter indicator was illuminated before cleaning, it will remain illuminated. Washing the pre-filter does not reset the runtime-based filter indicator. The indicator tracks hours of operation; only full filter replacement and a manual reset clears it. The correct indicator reset procedure is detailed in the companion guide, Filter Life Reset: Step-by-Step Guide: How to Reset the Check Filter Indicator on Levoit Core 200S.
CLEANING FREQUENCY GUIDELINES
The appropriate washing frequency depends on the pollutant load in the operating environment:
Standard residential use (no pets, normal household dust):
Wash every 4 to 6 weeks, or when visible light gray loading is observed on the mesh surface.
Homes with one pet:
Wash every 2 to 3 weeks. Pet hair and dander load the pre-filter rapidly, and the visual accumulation on the mesh is a reliable trigger.
Homes with multiple pets or during seasonal shedding:
Wash every 1 to 2 weeks. During heavy shedding seasons, weekly pre-filter cleaning will maintain CADR near the rated specification.
High-dust environments (near construction, dusty climate):
Wash every 1 to 2 weeks during active dust periods.
The useful life of the filter assembly as a whole depends substantially on pre-filter maintenance frequency. A filter whose pre-filter is washed consistently at the recommended interval can maintain adequate CADR for the full 6 to 8 month recommended replacement interval. A filter whose pre-filter is never washed may reach practical CADR performance limits in 3 to 4 months in a moderate-load environment.
HOW MANY TIMES CAN THE PRE-FILTER BE WASHED?
The nylon mesh is designed to withstand repeated washing throughout the filter’s service life. There is no official Levoit specification for the number of wash cycles the pre-filter mesh supports, but the nylon material, when washed correctly in lukewarm water without detergents or heat, will typically remain structurally intact for 10 to 20 wash cycles without mesh distortion or fiber degradation.
Inspect the pre-filter mesh periodically for:
- Visible fraying or distortion at the mesh edges
- Areas where the weave has been disturbed or stretched
- Any tears or holes in the mesh surface
A damaged pre-filter mesh allows unfiltered air to bypass the HEPA layer through the damaged area. If mesh damage is present, the entire filter assembly should be replaced regardless of its runtime indicator status.