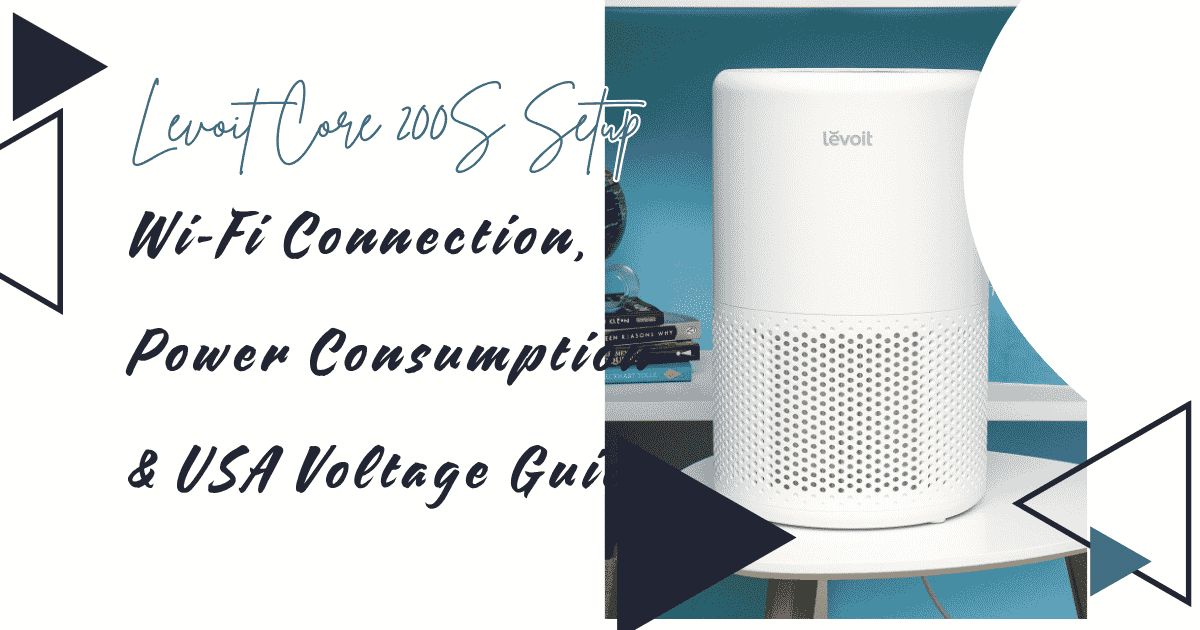
The Levoit Core 200S arrives ready for first use with minimal assembly. The filter is shipped inside the unit but sealed in a protective bag that must be removed before operation. Beyond this single preparatory step, the setup pathway divides into two tracks: a fully offline track where the unit operates as a standalone appliance controlled by its front panel touch display, and a connected track where the unit is paired to a 2.4 GHz Wi-Fi network and managed through the VeSync application. Understanding both tracks and the specific technical constraints of the Wi-Fi pairing process prevents the majority of setup failures that new owners encounter.
This guide covers every step of the Core 200S setup sequence, explains the power consumption characteristics at each operating mode, and addresses the specific voltage and frequency requirements that apply to US residential electrical systems.
BEFORE POWERING ON: FILTER BAG REMOVAL
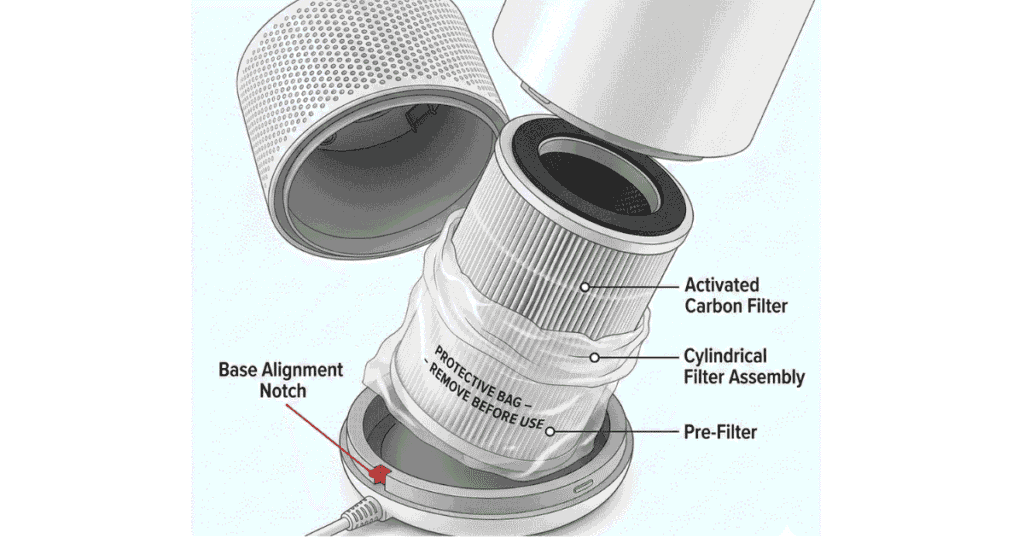
The most common first-use mistake on the Core 200S is powering the unit on without removing the protective plastic bag from the filter. The filter arrives inside the unit, wrapped in a sealed bag to preserve the activated carbon layer’s adsorption capacity during shipping and storage. Operating the unit without removing this bag circulates air through the bag rather than through the filter; no filtration occurs, and the machine appears to underperform.
Filter bag removal procedure:
1. Rotate the lower body counterclockwise approximately 30 degrees and lift to separate the base from the upper housing.
2. Lift the cylindrical filter assembly out of the base section.
3. Remove and discard the clear plastic protective bag.
4. Inspect the filter for any shipping damage. The outer pre-filter surface should be intact with no tears.
5. Reinstall the filter in the base section with the Levoit logo facing outward and the alignment notch matching the base slot.
6. Reattach the upper housing by lowering it onto the base and rotating clockwise until it locks.
Do not wash or wet the HEPA or carbon layers of the filter at any point. Only the outermost nylon pre-filter surface is washable.
PLACEMENT REQUIREMENTS FOR OPTIMAL PERFORMANCE
Before establishing the permanent placement location, understand the airflow architecture: the Core 200S draws air inward through intake slots around the entire lower perimeter of the cylindrical body and expels filtered air upward through the top diffuser.
Minimum clearance requirements:
All sides: 15 cm (6 inches) minimum from walls, furniture, and curtains
Top: 20 cm (8 inches) minimum from the ceiling to allow clean airflow discharge
Floor vs. elevated placement: floor placement is effective; desk or table placement improves performance in rooms with high-traffic pollutant sources (pets on furniture, desk activities generating dust)
Placement to avoid:
- Direct sunlight exposure, which can degrade the plastic housing and affect the infrared air quality sensor’s accuracy
- Inside closets or enclosed cabinets, the intake restriction significantly reduces CADR
- Adjacent to HVAC vents, which can introduce unfiltered air directly to the unit’s sensor and skew Auto mode behavior
STANDALONE OPERATION: TOUCH PANEL CONTROLS
The Core 200S operates fully without a Wi-Fi connection. All primary functions are accessible via the touch-sensitive LED display on the front of the upper housing.
Touch panel functions:
Power button: Long-press (2 seconds) to turn on/off; short-press to cycle through fan speeds
Fan speed: Short-press the power button to cycle Low → Medium → High → Auto → Sleep
Lock button: Activates child lock, disables all touch inputs except long-press power off
Filter indicator: Illuminates when the cumulative runtime timer reaches the replacement threshold
Air quality indicator: Three-color ring (Blue/Orange/Red) reflecting the infrared sensor reading
The touch display board, its LED configuration, touch sensor layer, and part number for replacement, is documented in the companion guide Levoit Core 200S LED Touch Display Board: Part Replacement and Schematics, which is the relevant reference for owners experiencing unresponsive controls.
WI-FI SETUP: THE 2.4 GHz REQUIREMENT AND WHY IT MATTERS
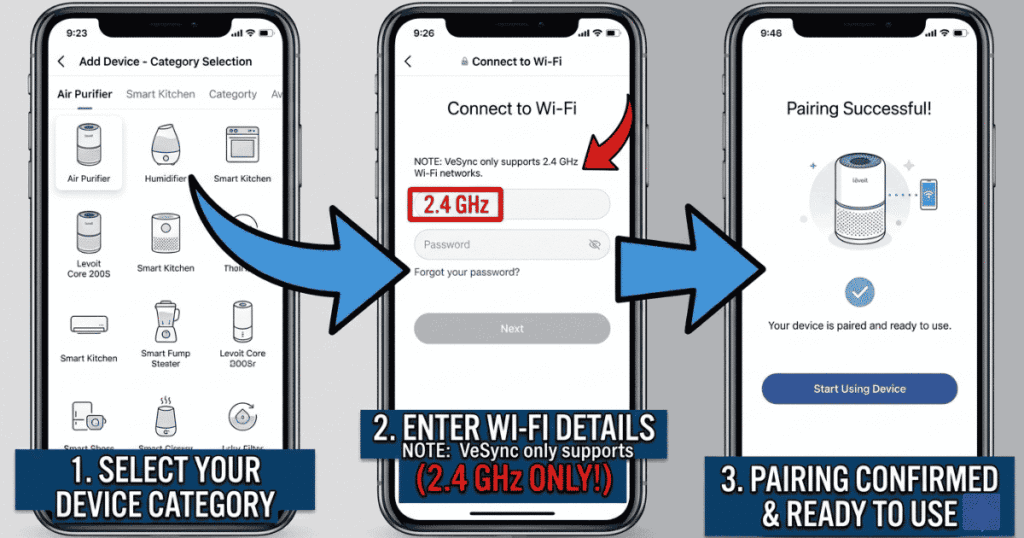
The Core 200S’s Wi-Fi module operates exclusively on the 2.4 GHz frequency band. This is the single most common source of pairing failure among new users in households with modern dual-band or tri-band routers.
Why 2.4 GHz only:
Modern home routers typically broadcast separate networks on 2.4 GHz and 5 GHz simultaneously, sometimes with the same SSID (network name) or with separate SSIDs. The Core 200S cannot detect or connect to a 5 GHz signal at all, not a range limitation, but a hardware limitation of the module. If a smartphone is connected to the 5 GHz band of a router during the pairing process, the VeSync app will attempt to provision the Core 200S onto a 5 GHz network that the unit cannot join, and pairing will fail consistently.
Before beginning the Wi-Fi pairing process:
- 1. Confirm your router broadcasts a 2.4 GHz network.
- 2. On your smartphone, manually connect to the 2.4 GHz network (not the 5 GHz network, not a combined “smart connect” network that auto-selects between bands).
- 3. Confirm the smartphone is on the 2.4 GHz band before opening the VeSync app.
VESYNC APP PAIRING: STEP-BY-STEP PROCEDURE
Requirements: VeSync app (iOS 11.0+ or Android 5.0+), a VeSync account, smartphone connected to 2.4 GHz network, Core 200S powered on.
Step 1: Power on the Core 200S and confirm it has not previously been paired to another account. If the unit was previously paired, perform a factory reset: with the unit powered on, press and hold the Lock button for 5 seconds until the Wi-Fi indicator light begins blinking rapidly.
Step 2: Open the VeSync app. Navigate to the Devices tab and tap the “+” button to add a new device.
Step 3: Select “Air Purifiers” from the device category list, then select “Core 200S.”
Step 4: The app will prompt you to confirm that the Wi-Fi indicator on the Core 200S is blinking. If it is not blinking, press and hold the Lock button on the unit until blinking begins.
Step 5: Enter your 2.4 GHz network name (SSID) and password. The app sends this information to the Core 200S via a provisioning protocol during which the phone temporarily connects to the unit’s own broadcast signal.
Step 6: The Core 200S will attempt to connect to the specified network. Successful connection is indicated by the Wi-Fi indicator light becoming solid (not blinking). In the app, the device will appear as online within 30 to 60 seconds.
Common failure points:
- Network password entry error (the most common cause)
- 5 GHz network selected instead of 2.4 GHz
- The router has MAC address filtering enabled that blocks new devices
- The router is more than 10 meters from the unit during initial pairing
If the unit connects successfully to the VeSync app but later drops connection repeatedly, the causes and fixes are covered in the guide Levoit Core 200S Keeps Disconnecting from Wi-Fi / VeSync App Fix.
VESYNC APP FEATURES OVERVIEW
Once paired, the VeSync app provides:
- Remote on/off and fan speed control
- Auto mode and Sleep mode activation
- Air quality history graphs (from the built-in infrared sensor)
- Schedule programming (specific on/off times and fan speeds)
- Filter life remaining indicator (mirroring the physical indicator)
- Device sharing with other VeSync accounts (household members)
- Voice assistant integration setup (Alexa / Google Assistant)
The VeSync app does not provide: PM2.5 numeric readings (the sensor is qualitative, not quantitative), firmware update notifications pushed to the user (updates deploy silently), or offline local network control (the app requires internet connectivity, not just LAN connectivity, for all commands).
US VOLTAGE AND FREQUENCY COMPATIBILITY
The Core 200S sold for the North American market is designed specifically for 120V AC / 60 Hz power, the standard US residential supply voltage and frequency.
What this means in practice:
- The Core 200S sold in the US cannot be used in countries with 220–240V supply without a voltage converter. The unit’s transformer and motor windings are designed for 120V; connecting to 220V will damage the unit immediately.
- The Core 200S sold in international markets (220–240V variants) cannot be used directly on US 120V supply without a step-up converter.
- The 60 Hz frequency specification is relevant to the motor’s AC synchronous components. The Core 200S uses a BLDC (brushless DC) motor driven by an internal DC power supply, making it less sensitive to frequency variation than synchronous AC motors, but it is still not rated or tested for 50 Hz use.
Extension cord compatibility:
The Core 200S draws a maximum of 40W at full speed. Any standard 16 AWG or heavier extension cord rated for 125V service is compatible. Ultra-thin “lamp cord” extension cords (18 AWG or lighter) are adequate for the Core 200S’s low current draw but are generally not recommended for appliances.
Surge protector and UPS use:
The Core 200S is fully compatible with standard surge protectors. Use on a UPS (uninterruptible power supply) is practical for continuous operation during power outages. The 40W maximum draw means even a modest 350VA UPS can power the Core 200S for 20 to 40 minutes.
POWER CONSUMPTION BY MODE: REAL-WORLD ENERGY COST
Understanding how much power the Core 200S uses at each fan speed allows owners to make informed decisions about continuous vs. intermittent operation.
Sleep mode: ~2W
Low speed: ~8W
Medium speed: ~20W
High speed: ~40W
Standby (powered off but plugged in): <1W
Daily energy cost at continuous high-speed operation (40W × 24h = 0.96 kWh): At a US average electricity rate of $0.13/kWh, approximately $0.12 per day / $3.65 per month / $44 per year.
Daily energy cost at continuous low-speed operation (8W × 24h = 0.192 kWh): Approximately $0.025 per day / $0.74 per month / $8.90 per year.
The energy economics strongly favor running the Core 200S continuously on Low or Auto mode rather than cycling it on and off. A fan that runs continuously on Low speed consumes less energy per month than one hour of high-speed operation per day, while delivering better air quality maintenance meaningfully through consistent air cycling. The Auto mode (which adjusts speed based on the infrared sensor reading) is the recommended default operating mode for continuous use, as it delivers high speed only when pollutant load is elevated and drops to low speed during clean ambient air periods.