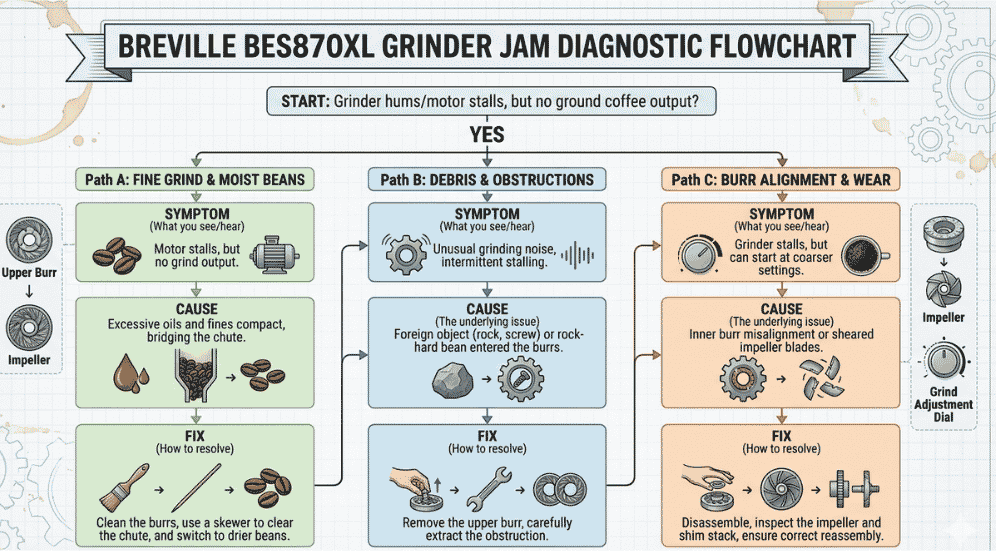
A jammed grinder is one of the most alarming failures a Breville BES870XL owner can experience. The machine is running, the motor sounds like it is trying to start, but the grinding chamber produces nothing, or the entire machine goes silent after a brief hum. Understanding what kind of jam you are dealing with and responding correctly is the difference between a two-minute fix and a broken burr.
Recognizing a Grinder Jam: The Diagnostic Signs
- The motor hums but does not spin. The control electronics are sending power to the motor, but the rotor cannot overcome the mechanical resistance. This is the clearest signal of a jam.
- The grinder runs briefly, then cuts out. The motor starts, encounters resistance, draws excessive current, and trips the thermal overload protector or the over-current circuit. The machine then requires a cooldown period before it will attempt to restart.
- Grinding output has been progressively decreasing for several sessions. This suggests a gradual compaction jam; grounds are accumulating in the delivery chute or between the burrs over time, slowly restricting flow until grinding becomes impossible.
- A foreign object sound was heard during grinding. A sharp crack, ping, or grinding metal sound during normal operation almost certainly means a hard object has entered the grinding chamber and become lodged between the burrs.
Safety First
Always unplug the BES870XL from the wall outlet before reaching into the grinding chamber. The grinder motor can restart unexpectedly, especially after a thermal overload has cleared. Never insert fingers or metal objects into the grinding chamber while the machine is plugged in.
Type 1: Clearing a Foreign Object Jam
If a foreign object, a pebble, metal fragment, or hard seed, has entered the grinding chamber and lodged between the conical burr faces, the priority is extraction without damaging the burr teeth.
- Unplug the machine and remove the bean hopper.
- Shine a flashlight into the grinding chamber and attempt to identify the object.
- Use a clean wooden skewer, chopstick, or wooden dowel to probe around the perimeter of the upper burr collar. Do not use metal tools; they can chip or nick the hardened burr edges.
- Attempt to rotate the upper burr gently by hand. Grasp it with two fingers at opposite edges and apply slow, deliberate rotational pressure. If the object is small, this rotation may dislodge it.
- If the object cannot be dislodged from above, remove the upper burr assembly. Rotate it counterclockwise until it unlocks and lift it free of the chamber.
- With the upper burr removed, the grinding chamber floor is accessible. The foreign object should now be visible and can be extracted with tweezers or a wooden implement.
- Inspect both burr faces carefully for chips, dents, or deformation before reassembling. Deep chips or missing sections of burr material require burr replacement. Continuing to grind with damaged burrs creates metal fragment contamination in the coffee.
Type 2: Clearing a Grounds Compaction Jam
A compaction jam involves no foreign object; instead, oily, compacted grounds have packed tightly enough around or between the burrs to prevent rotation. This type of jam is common on machines that have not been cleaned regularly, or when very oily, dark-roasted beans have been used extensively.
- Unplug the machine and remove the bean hopper.
- Use the included cleaning brush to sweep all loose grounds out of the visible upper portion of the grinding chamber.
- Attempt to rotate the upper burr by hand. If it moves with resistance (rather than being completely locked), this is a compaction jam rather than a foreign object jam.
- Remove the upper burr assembly (counterclockwise rotation to unlock).
- Use a stiff brush and compressed air to clear the compacted grounds from the grinding chamber walls, the lower burr surface, and the delivery chute passage at the base of the chamber.
- Inspect the delivery chute opening. Use a wooden skewer to probe and clear this channel.
- Reassemble the upper burr, set the grind size two to three clicks coarser than your normal setting, and run a 10-gram test dose before returning to your standard setting.
Type 3: The Burr-Closure Jam (Too-Fine Grind Setting)
A third type of jam occurs when the grind size has been adjusted too fine, to the point where the static gap between the burrs at startup is smaller than the motor’s starting torque can overcome. This is especially common when users adjust the grind setting while the grinder is not running. The BES870XL manual explicitly states that grind size adjustments should only be made while the grinder is in operation. Adjusting while stationary can advance the collar past the point where the burrs have a functional gap, effectively causing them to pre-contact.
- With the machine plugged in, press and hold the Grind button.
- While the motor is attempting to start (hum phase), slowly rotate the grind size dial counterclockwise (toward a coarser setting).
- The increased burr gap will reduce the load on the motor. It should begin to spin within two to four clicks of coarsening.
- Allow the grinder to run for five to ten seconds, then release the Grind button.
- Return the grind size to your previous working setting, this time making the adjustment while the grinder is running.
After Clearing the Jam: What to Check
Before resuming normal operation, confirm three things. First, burr integrity inspect both burr faces with a flashlight for visible damage. Minor surface scratches are acceptable; chipping or deformation requires burr replacement. The procedure for that operation is detailed in the companion guide How to Replace Grinder Burrs on Breville BES870XL.
Second, grind consistency: run a test dose of 10–15 grams and inspect the grounds. Post-jam grounds should look normal, consistent, uniform powder appropriate to the espresso setting. Third, motor temperature: touch the top panel above the grinder chamber. If it feels warm to the touch after only a brief jam-clearing attempt, the thermal overload may have been active. Allow the machine to cool for 20 minutes before the next use.
Preventing Future Jams: The Core Practices
- Use pre-sorted specialty coffee. Quality specialty roasters sort beans before roasting to remove defective beans, which include dried cherries and hardened seeds, two of the most common foreign object jam culprits.
- Avoid very oily, dark-roasted beans. Oily beans coat the burrs rapidly and accelerate compaction. If dark roasts are preferred, increase cleaning frequency to a weekly burr brushing minimum.
- Never adjust grind size while the grinder is stationary. This is the single most preventable cause of burr-closure jams on the BES870XL.